
Be in the Know
Elevate your industry knowledge with yoga articles and insights crafted by experienced industry experts
Elevate your industry knowledge with yoga articles and insights crafted by experienced industry experts
For a joint to be functional and serve us in our daily activities, it needs to be both flexible and stable. One without the other can lead to a joint that does not function well. For example, a joint and its surrounding tissues can be very strong but not allow the range of movement required for that person do the activities they need and want to do in daily life easily. Similarly, a joint can have a huge range of movement due to repetitive progressive flexibility work but due to over stretched tendons and ligaments, offers little support from its surrounding tissues leading to wear and tear on the joint. An example of this is the hip joint.
The hip joint is a ball and socket synovial joint which forms a connection from the lower limb (leg) to the pelvic girdle, or more specifically, the ileofemoral, pubofemoral and isciofemoral ligaments which join the head of the femur to the pelvic acetabulum (a cup like depression in the pelvis). These work alongside the muscles of the hips in a reciprocal fashion by tightening when the joint is extended, flexed or abducted, ie: the leg is moved away from the hip joint, keeping the joint stable. As a result, the hip is the perfect structure for weight bearing activities as it naturally offers stability as opposed to naturally offering a large range of movement.
Furthermore, if the hip joint is opened and stretched far past its natural and healthy range of movement consistently and then load is applied as well, let’s say in the form of body weight and gravity as is often the case in yoga, pressure in the joint can occur.
An example of this within the yoga posture repertoire is Hanumanasana, or commonly known as the ‘splits’, where one hip is in flexion and the other is in extension. The weight of the upper body is then located centrally over the pelvis, which in this case is the axis point at which the movement occurs. Load in the form of the upper body and gravity is then applied. When done repeatedly, the connective tissue can lose their ability to retract once the body moves out of this position.
The surrounding muscles then have to over work and tighten up around the joint to offer the now lacking stability normally offered by the connective tissue, giving a feeling of stiffness. This often leads the participant to do more stretching to alleviate the feeling of stiffness, which over a long period of time leads to further over stretching of the joint leading to even more weakness and instability.
 Eventually the femoral head (head of the femur) may press more firmly into the acetabulum placing pressure on the bursa (a pad like structure that acts as a cushion within the joint). This kind of compression can cause nerve pain, in the case pain coming from the femoral nerve, which can feel like a deep ache deep in the hip joint or sharp pain such as sciatica.
With this in mind then, it can be said that by repeatedly stretching the hip joint past its healthy range of movement and therefore pushing through its necessary bio feedback mechanism, we are asking it to do a job that is was not designed for, creating dysfunction within the joint as the ligaments can no longer do their job of holding the joint in place, as it now offers little strength and stability.
A more functional way to simultaneously open and strengthen the hips in order for flexibility to be improved whilst maintaining stability, would be to practice yoga postures which extend, flex or abduct the femur away from the pelvis but require strength work from the hips to hold the body in place. An example of this is Crescent Lunge Pose. The legs are in a position where one is extended and the other flexed from the hip joint.
As the stance is on a narrow line and the arms are extended, creating long levers, it is more challenging to balance than if we opted for a hip opening yoga posture where the pelvis is on the ground, as we are now working against gravity as opposed to allowing gravity to completely draw the pelvis to the floor.
Therefore, the stabilizing muscles which surround the pelvis after initially moving the legs in to place, now have to act as ‘fixators’ by contracting firmly via an isometric muscle contraction. This helps to train the muscle fibres to act as fixators when is required thus improving the stability of the hips, and because we have also applied a health range of movement to the pelvis, a functional level of flexibility is also maintained.
The following yoga postures are functional and a fantastic addition to any exercise regime as they all require a considerable stretching of the hips to move the body in to position, before strength in the form of isometric muscle contraction is applied to maintain the position. This leads to flexibility being maintained whilst stability is increased.
Alanasana (Crescent Lunge Pose)
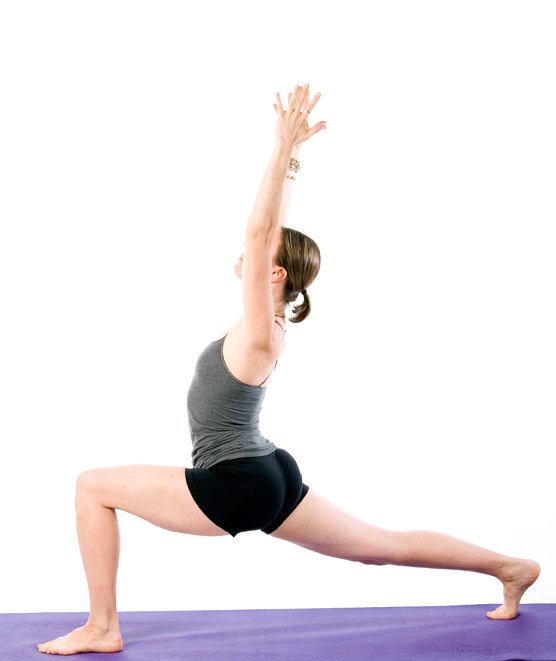
From Mountain pose (standing with legs together and arms by your side) take a big step back (approximately 1.5m) with the right leg and at the same time bend the left knee to a ninety degree angle so you are in a runner’s lunge position. The toes of the right foot are tucked under and the hips are facing forwards. Reach the arms directly upwards so they are in line with the ears and the hands are shoulder width apart. Keep the right leg as straight as possible to increase the stretch in the hip flexors of the right hip, and strongly contract the quadriceps, keeping the heel off the ground.
Ensure the left knee is directly over the left ankle, the thigh is parallel with the edge of your yoga mat and parallel to the floor. Now contract the abdominal muscles towards the spine to help support the lumbar region.
Lift you gaze towards the little fingers and breathe deeply at least five times so you feel the rib cage expand and retract. With control, move back to your start position by stepping the right foot forward to meet the left foot, moving as slowly as possible to improve your stability, and repeat on the other side.
Benefits:
Utthita Parsvakonasana (Extended Side Angle Pose)
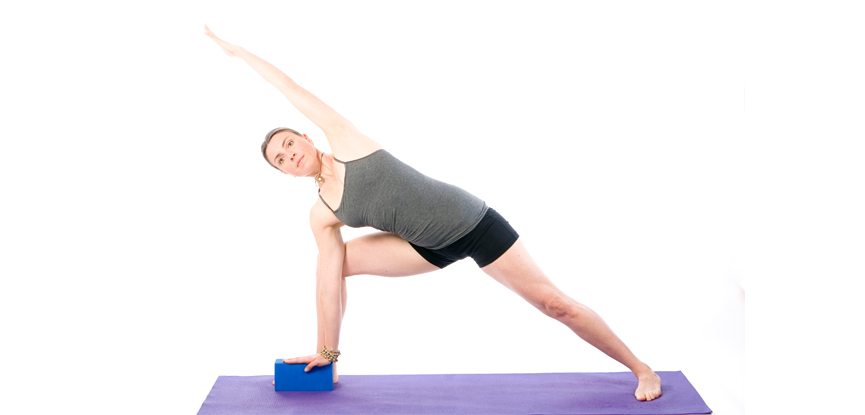
Start in Mountain pose before stepping the feet approximately 1.5m apart and then place a yoga block on the inside of the right foot. Reach your arms out to either side so they are parallel to the floor and then place your right forearm on your right thigh. Now extend your left arm straight up and over so it is in line with your left ear with your palm facing the floor.
Stretch from the edge of the left foot all the way through to your left fingertips, lengthening the entire left side of your body. Keep the right knee directly over the right ankle with the thigh parallel to the floor, and once you have the feeling of length through the left side of the body, allow your right hand to drop down onto the yoga block.
To help stretch the right adductor muscles, gently push into the right inner thigh with the right arm. Look forwards and relax the face. Ensure you maintain the strength through the legs and abdomen so the right arm does not have to support the posture by placing weight in to the right hand.
Breathe deeply at least five times so you feel the rib cage expand and retract, and then with control, move back to your start position. Repeat on the other side.
Benefits:
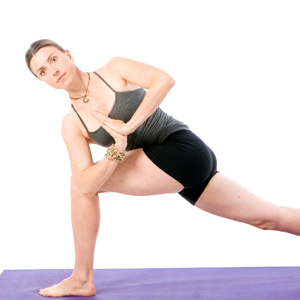
Parivrtta Parsvakonasana (Revolved Extended Side Angle Pose)
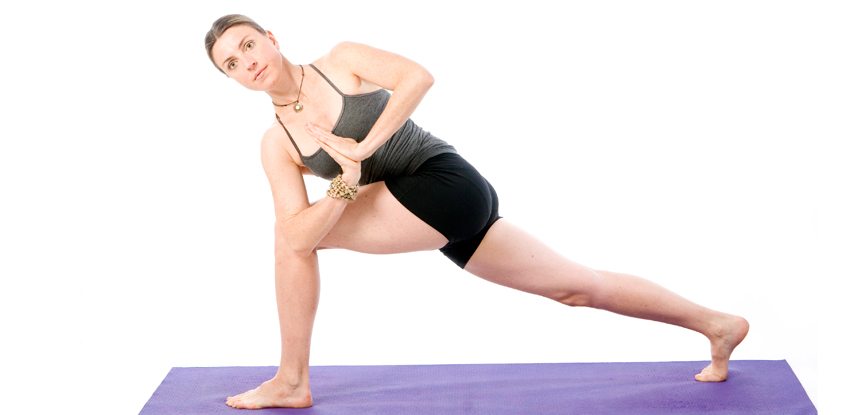
From Mountain pose move into a Crescent Lunge position as described above, with the left leg forwards and the right leg extended with the toes tucked under. Bring the hands in front of the chest in a prayer position before exhaling and turning the torso to the left, and pressing the right elbow to outer left thigh.
Now try to create as much length through your torso as possible before lifting the upper body away from the left thigh a little to increase work through the core. This will also allow more space to breathe more deeply. Keep your right leg active by extending strongly through the right heel.
Breathe deeply here at least five times so you feel the rib cage expand and retract, and then with control, move back to your start position. Repeat on the other side.
Benefits:
Utthita Hasta Padangusthasana (Extended Hand to Big Toe Pose)
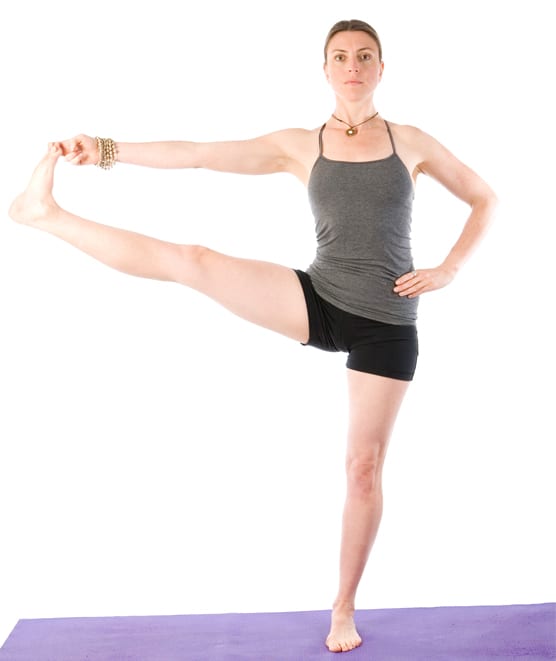
From Mountain pose lift the right knee toward the abdomen and then reach the right arm inside the thigh and take hold of the right big toe with the first two fingers of the right hand. Keep the left leg strong by contracting the quadriceps firmly. As you exhale, extend the right leg forward and straighten the knee as much as possible. If both legs are now straight, move the leg out to the side and press into the right heel. Rest the left hand onto the left hip. Both legs should be straight and the spine is in a neutral position. Now to help keep the lower back and pelvis in good alignment, tuck the pelvis under slightly and press the right hips forwards a little. At the same time, support the lower back by contracting the abdominal muscles.
Breathe deeply here at least five times so you feel the rib cage expand and retract, and then slowly and with control, move back to your start position. Repeat on the other side.
N.B. If unable to straighten the right leg, hold a strap in the right hand and loop it around the sole of the right foot. Or simply keep the right leg bent and hold around the outside of the right knee
Benefits:
Urdhva Prasarita Eka Padasana (Standing Splits)
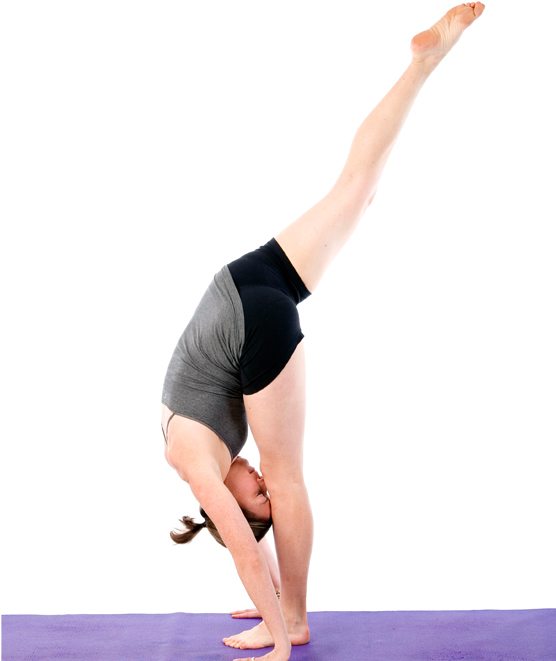
From Mountain pose, move into a forward bend bringing the hands to the floor just in front of the feet. Now shift the body weight to the left leg and slowly raise the right leg whilst folding the upper body closer towards the left leg. Hold the raised leg parallel to the floor and check that the left leg is straight and the quadriceps are firmly contracted. Now slowly try to raise the right leg slightly higher as the right hip turns out to the right a little. Ideally your torso should descend as the leg ascends.
Breathe deeply here at least five times so you feel the rib cage expand and retract, and then slowly and with control, move back to your start position. Repeat on the other side.
N.B. If your hands do not rest comfortably on the floor, support each one on a yoga block. Or for more of a challenge, try grasping the back of the left leg or ankle with the right hand.
Benefits:
Keen to learn more? Learn more yoga asanas and how to instruct a class with a yoga teacher training course.
Sally Parkes BSc is an experienced yoga teacher who runs yoga and Pilates retreats, and regular classes and events. She’s previously been featured in Yoga Magazine, Vogue and Om Yoga, and is the author of The Student’s Manual of Yoga Anatomy.
And embrace the rich and vibrant world of yoga
Great news, you're on the list...